
Historic Master Bath Remodel in Belleville, IL
- Location: Belleville, IL
Project Summary: Historic Master Bath Remodel
Located in the Country Club neighborhood at the West End of Belleville, this historic, two-story 1928 house was exactly what this family wanted for their new home. It was perfect for their needs – except for the master bathroom, which had been updated sometime in the 1990s and featured only a sunken tub and no shower.
The layout of the bathroom and storage needed some help and finishes needed to be updated. The bathroom was to be remodeled with modern conveniences while still maintaining the historic look and feel of the rest of the home.
The Vision
The homeowners’ main priority was to replace the dangerous sunken tub with a functional shower. We explored two different floorplans with the shower in different spots. In one floorplan the shower and toilet would switch places. This would have taken advantage of the awkward corner for shelves and a bench inside the shower. In the other floorplan, the toilet remained in the same location and the tub was replaced with a shower.
We brought a plumber and an electrician on board early in the process and they concluded that it was going to be very expensive to relocate the wall-hung toilet. The existing toilet had a large, commercial-style carrier in the wall that would have to be removed if the shower was going to take its place.
The floor plan with the larger shower would have cost almost $5,000 more because of the plumbing in the old home. The homeowners decided that it was not worth the extra expense and moved forward with the other floorplan.
The Challenge
The master bathroom featured a large sunken tub that was not only impractical for everyday bathing, but it blocked almost all the access to the toilet. The existing built-in cabinet was beautiful, but in disrepair. It had been painted so many times that the doors stuck and most of the drawers would not even open. The double pocket doors into the bathroom also had many layers of paint, making them hard to operate. The vanity was large but lacked ample storage because of a knee space in the center.
The layout was not functional and the last update was not in keeping with the style of the home. The new homeowners wanted a new space that felt like it had been there the whole time. We worked with the homeowners and several trade partners to come up with the best plan for this space.
Ultimately, we needed to make the existing footprint work and take care not to damage any of the surrounding architectural features.
The Transformation
The toilet remained in the same location, but we were not able to completely eliminate an awkward chase in the corner because it was part of the chimney on the first floor. However, we were able to minimize the framing surrounding the chase, reducing its size. The sunken tub was removed, the floor rebuilt, and a new shower was framed in that spot, but with an angled wall that allowed full access to the toilet. We finished it with classic white subway tile with a light gray grout that wrapped around the room and was topped with a detailed tile chair-rail.
We made the vanity a little smaller, but more usable. We opted for a freestanding vanity that looked more like a piece of furniture and was set about a foot away from each corner, allowing for a larger walkway between it and the shower and helping the room feel larger. The vanity was painted a creamy white to mimic the built-in cabinet. The new vanity was taller than the existing one and had a stack of drawers in the center rather than a knee space, making it more functional for storage.
Arkad Refinishing worked their magic on the built-in cabinet, while our carpenter worked his on the pocket doors. Arkad was able to remove enough of the old paint to get the doors and drawers functioning again. They gave the whole cabinet a fresh coat of paint which had it looking brand new again. They replaced the missing shelves in the top portion and the latch. Our carpenter took the pocket doors completely off their tracks. He sanded the doors to eliminate the built-up paint and repaired the bent tracks. After a fresh coat of paint, the doors were carefully rehung and now work perfectly.
The lighting and electrical plan were updated as well. The two directional cans in front of the built-in were replaced with new LED lights positioned more in the center of the room to light the entire space. The fluorescent light box was removed and three sconces were installed at the vanity to evenly light the mirrors. An outlet was relocated from the side of the old cabinet to the wall near the second vanity sink.
Lastly, another outlet was installed near the toilet to accommodate a Washlet toilet seat.
We worked as a team with the homeowners and our trusted trade partners to ensure a perfect remodel. We were able to avoid costly change orders and expensive plumbing moves by exploring the options early on. The outcome is a beautiful and functional master bathroom.
Unique Products
We strived for a master bathroom that met the needs of the new owners and matched the style of the old home. We used several unique products to achieve this balance. Notably, the master bathroom lacked space for a separate bidet; when we upgraded their toilet, we included a Toto Washlet seat and the necessary outlet.
We painted the ceiling the same shade of light blue as the walls. The ceiling height in the bathroom was only 93 inches, three inches shorter than the standard eight-feet. This trick carries the eye upward with no dividing line between the colored walls and the white ceiling. The room feels taller and, as a result, larger. We used a semi-gloss paint on the ceiling to help reflect more light back down into the room.
BEFORE
This before photo was taken from a previous real estate listing of the home. The wallpaper had been removed and the carpet replaced with tile by the time we started our remodel. The cabinet was beautiful, but the doors and drawers hardly opened after years and years of paint. The vanity was large, but low, and it lacked storage. The fluorescent lightbox was unflattering and the only overhead lighting was directed on the built-in.
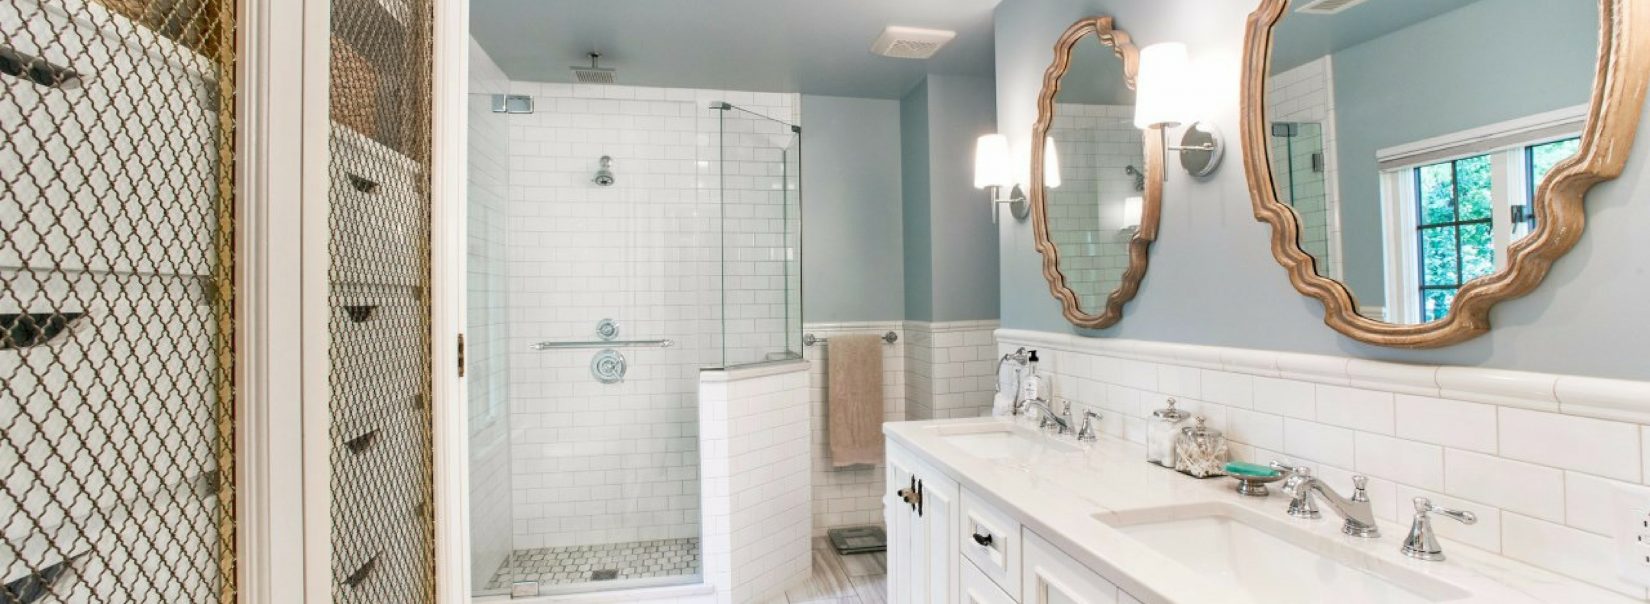
AFTER
A full after shot of the bathroom featuring the newly refinished built-in cabinet, furniture-style vanity, and their new custom shower.
AFTER
A detail photo of the vanity and subway tile chair rail. New faucets feature a traditional style and classic chrome finish. The new quartz top mimics natural marble, but it much easier to maintain.
AFTER
A small ledge is concealed behind the angled wall in the shower, a convenient and discreet spot to store toiletries. The ledge is the perfect height for shaving legs. The Cambria quartz top is easy to clean and will hold up well in the shower.